What is Automatic Internet Data Matching?
Automatic Internet Data Matching is an optional feature of Family Historian. When it is enabled, Family Historian will automatically try to find historical records or family tree profiles, that match individuals in your projects, using Internet services provided by two data providers, Findmypast and MyHeritage. In the future, more data providers may be added.
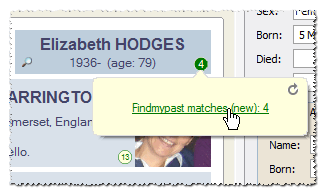
If matches are found, ‘hints’ (sometimes called ‘web hints’) are displayed within the program. These hints display as little white and green numbered circles in the bottom right corner of boxes, in the Focus Window. When you move your mouse over a hint, a little balloon will appear with links you can click on to view more details of the matches.
The first time you run Family Historian (or the first time after an upgrade, if a new data provider has been added), a window will be displayed giving you a choice of which data providers you wish to use. You can use either or both. If you do not wish to use this feature at all, untick both providers or click the ‘Disable All’ button. You can also enable or disable these services at any time in Preferences (see the Internet Data Matches tab).
How Does it Work?
 When an Automatic Internet Data Matching service is enabled for one or both supported data providers, information from parts of your family tree is periodically passed, ‘behind the scenes’ and without you having to do anything, to the matching service provided by whichever data provider you enabled, or to both of them if you enabled both. This information includes names, dates and places associated with individuals and their close relatives. The matching services returns information about the matches found. Family Historian alerts you to the matches with hints (the green-and-white numbered circles) in the Focus Window.
If you have enabled ‘Smart Matches’ within MyHeritage, you may also be notified of matches to family tree profiles held on the MyHeritage website.
How Do I Use It?
Assuming you have enabled Automatic Internet Data Matches for one or both data providers, you may notice hints starting to appear in the bottom-right corner of boxes in the Focus Window (Spouses & Children or Parents & Siblings tabs only) for some of the people in your project. You don’t have to do anything to make this happen. It happens automatically. The hints display the number of matches that have been found for each person. If no matches are found for a person, no hint will be displayed for them.
Move the cursor over one of the hints. When you do this, a little popup balloon appears. The balloon will contain more information about the matches and either one or two links to the data providers that found the matches. The links might look something like this:
Findmypast matches (new): 3
MyHeritage matches (pending): 3
Even if both data providers are enabled, there may be only one link. If a data provider finds no matches, there will be no link for them.
Click on one of the links. When you do this, a results page will be displayed, on the website of the data provider in question. By default, this page will be displayed in Family Historian’s Web Search window. However, if you prefer, an ordinary external web browser can be used. You can configure this in the Internet Data Matches tab of Preferences.
You will be able to see some details of the matches that the data provider has found on the results page. To view full details, click on one of the matches. If you already have a suitable subscription with the data provider in question, you may be taken immediately to another page, showing full details of the match. Alternatively, you may instead first be taken to a prompt page where you are invited to sign in to your account, or create a new one, and you may be prompted to purchase a suitable subscription for viewing the match in question. Family Historian users are automatically entitled to a discount on MyHeritage subscriptions.
 When you a view a match, you need to decide if it is a correct match or not. If it is correct, and if the record contains details that you don’t already have, you will want to copy this data into Family Historian. When updating your records from data provider web pages, you can use copy-and-paste (press Ctrl-C to copy and Ctrl-V to paste). Or you can use drag-and-drop from the Web Search window, to drag the text into fields in the person’s record in the Property Box. Either way you can update your records without having to do any typing. Before you add data to a person’s record, however, you may also wish to use the Automatic Source Citation pane (see right) to specify the source for your data. You can use drag-and-drop or copy-and-paste from the information in the web page into the Automatic Source Citation pane, so again there should be little need for typing. When automatic source citations are enabled, all new or updated data will be automatically given the source citation you specify. So don’t forget to disable automatic source citations as soon as you have finished inputting the data. If you prefer, instead of using automatic source citations, you can add a source citation from the yellow Citation List pane in the Property Box, in the usual way.
When you have finished copying the data into Family Historian, click the appropriate button to accept/confirm the match.


If the match is not correct, you should take the option to reject it instead.
By default, you will only see hints about new/pending matches, and not ones that you have already accepted/confirmed, or rejected. However, you can opt to view accepted/confirmed matches, or rejected matches, if you need to.
About Findmypast
With Findmypast, matches are either New, Accepted or Rejected. By default, you will only see hints for New matches within Family Historian. You can accept or reject a match by clicking on appropriate buttons at the foot of the Findmypast details page for the match. When viewing a list of matches in the Findmypast results page, you can choose to view either New, Accepted or Rejected matches. You can also choose to show hints for Accepted or Rejected matches within Family Historian, if you wish to. Findmypast hints can be configured (and enabled or disabled) in the Internet Data Matches tab of Preferences.
See the Findmypast privacy policy (especially the section on ‘Record Matching’) for information about Findmypast’s policy with regard to privacy and data.
About MyHeritage
With MyHeritage, hints are either Pending, Confirmed or Rejected. By default, you will only see hints for Pending matches within Family Historian. You can confirm or reject a hint by clicking on appropriate buttons in either the details page, or the results page. You can also choose to show hints for Pending, Confirmed or Rejected hints within Family Historian (or combinations). MyHeritage hints can be configured (and enabled or disabled) in the Internet Data Matches tab of Preferences. You can opt to view Record Matches (historical records), Smart Matches (family trees) or both. You can also specify a minimum confidence level, if you feel you are seeing too many hints or too few. If you set the minimum confidence level high, you should expect few hints but a high level of accuracy. If you set the confidence level low, you should expect more hints, but a lower level of accuracy. If you have enabled Smart Matches, and you keep family tree information in MyHeritage you may find that you get matches to your own family tree that you stored in MyHeritage. You can exclude one or more family trees by specifying the email addresses (separated by a space, if there is more than one) of the MyHeritage accounts you wish to exclude.
See the MyHeritage Matches & Privacy Policy statement for information about MyHeritages’s policy with regard to privacy and data.