
Special Plugin Types
Smart Folder Plugins
Smart folders are a powerful technology that allow complex data to be organised, browsed and explored in a folder structure, akin to the way files are organised into a structured hierarchy of folders, by File Explorer. Smart folders are stored in collections called Folder Sets. Each folder set has a type. Folder set types correspond exactly to query types. Excluding the header record which is a special case, there is one query type, and one folder set type, for each record type. There are 12 record types in Family Historian. In alphabetical order, these are: Address, Family, Individual, Media, Note, Place, Repository, Research Note, Source, Source Template, Submission and Submitter. In addition to these 12 record types, there are also 3 non-record folder set types (and query types). These are: Fact (event or attribute), Source Citation, and Witness (shared events). So there are in total 15 folder set types, and 15 query types.
Every folder set has one or more smart folders, and every smart folder has a smart folder type. There are 4 types of smart folder. These are:
- Simple
- Query
- Plugin
- Auto
A single folder set may have multiple smart folders of each of these
types. These will typically be organised into a simple tree
structure. You will have a number of top-level smart folders, some
of which may have subfolders, which in turn may have more subfolders ...
and so on indefinitely. All smart folders except auto smart
folders can have subfolders. And these subfolders are also,
themselves, smart folders. A single smart folder may correspond to
a complex many-level branch of multiple display folders that the user
sees when they browse and explore their data.
To learn more about using smart folders, see the Smart Folder section in the main application help. This section assumes that you are familiar with using smart folders. It describes how to create the Plugin smart folder type.
Create, Edit, test and Install Smart Folder Plugins
Ordinary plugins are created, edited, tested and run from the Plugins
Window (although they can optionally also be run from the Tools
menu). Smart folder plugins are also created, edited and tested in
the Plugins Window. But they are not run from the Plugins
Window. When you are satisfied that your smart folder plugin is
complete, you will need to copy all of the code into the appropriate
smart folder. If you later need to make changes to your plugin,
you will need to copy the code into a new plugin in the Plugin Window,
edit it and test it there, and then copy the code back into the
appropriate smart folder. When you have done that, you can delete
the plugin you used for testing if you want to.
To see how this works, we will use the example of the 'Occupations' smart folder which is part of the 'Individuals' folder set. That folder set is a standard folder set. Standard folder sets are not editable, however you can copy them and edit the copy. So that is what we will do. You are recommended to follow through the following steps yourself.
-
Open the Family Historian Sample Project. Click on the Query button on the main application toolbar, and choose "Manage Folder Sets" from the dropdown menu that appears. The Folder Sets Window opens (see figure 1 below). Select the "Individuals" folder set and click the button. You will be prompted to enter a name for the clone. Call it "Individuals 2" and press . This will create a new folder set called "Individuals 2".
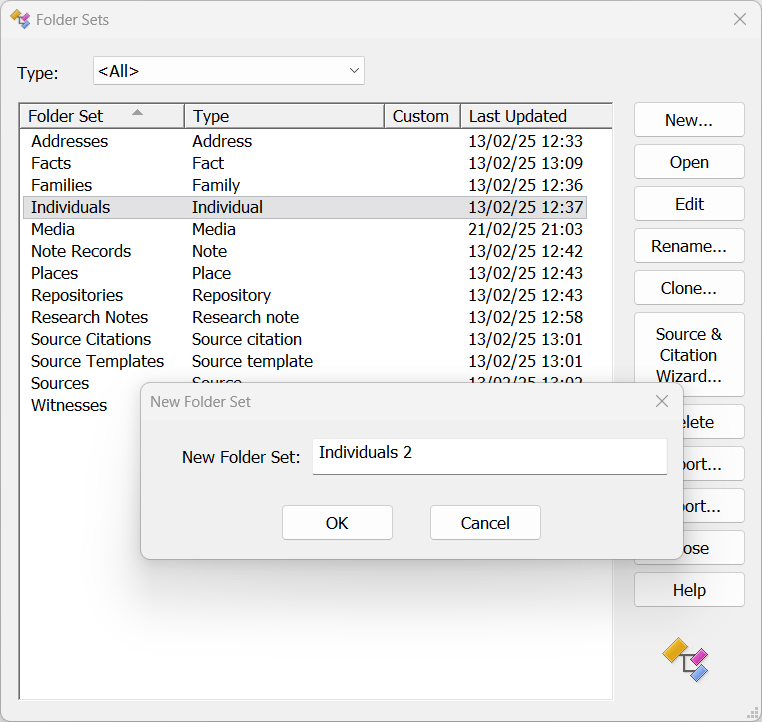
Figure 1. The Folder Sets Window.
-
Select the "Individuals 2" folder set in the list and click the button. A message prompt will warn you that folder sets are edited in the Query Window and ask if you wish to switch to the Query Window. Click to confirm. The Query Window will be displayed with the smart folder pane open on the left-hand side in design mode (brown background and Design Mode button pressed), with the "Individuals 2" folder set selected (see figure 2 below).
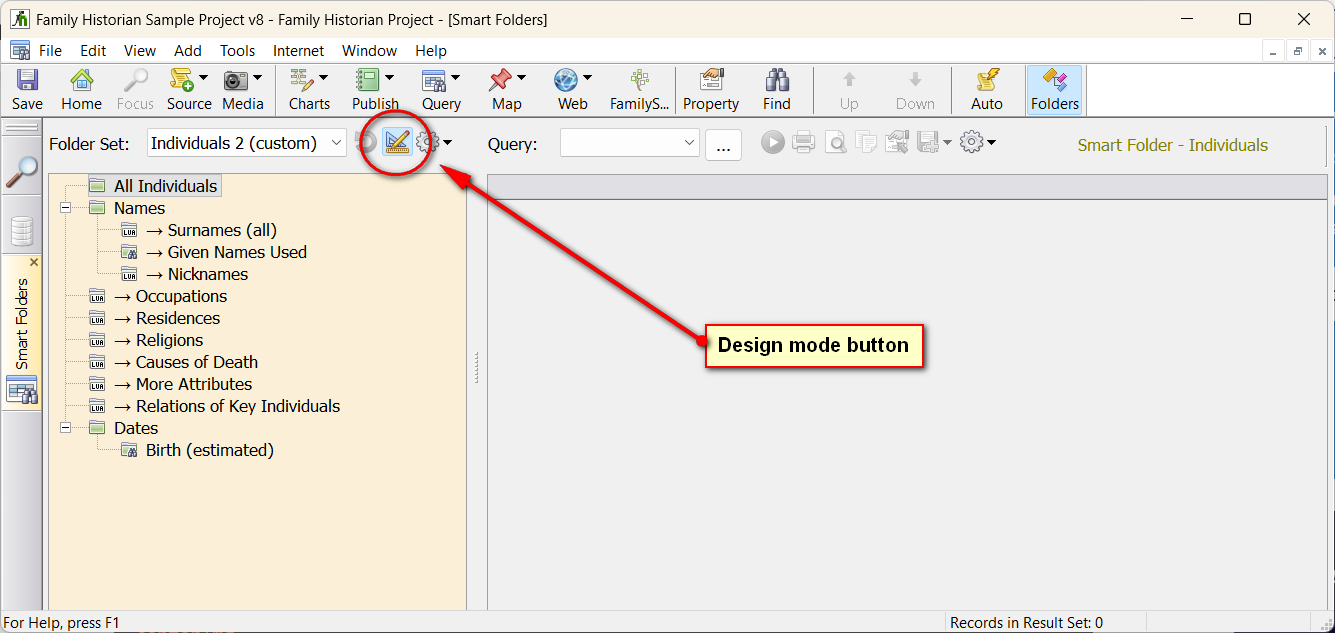
Figure 2. Query Window with Folder Set Pane in Design Mode
-
You should see "Occupations" in the list of smart folders. Click on this using the right-mouse button and choose 'Edit' from the dropdown menu that appears. An "Edit Smart Folder" window will be displayed (see figure 3 below), showing the folder name as "Occupations" and the folder type as "Plugin".
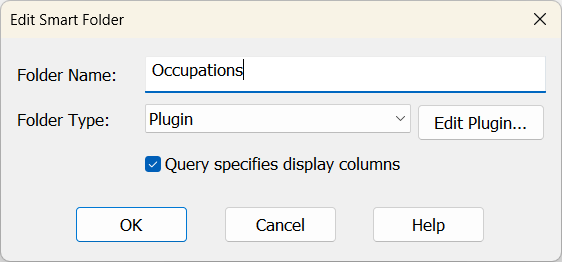
Figure 3. The Edit Smart Folder Window.
-
Click the button. Another window will open, with caption "Smart Folder Plugin Script", showing the plugin used by the Occupations smart folder. Click in the body of the text and press Ctrl-A to select the full text. Then press Ctrl-C to copy it to the clipboard. Press to close the Smart Folder Plugin Script window, and press again to close the Edit Smart Folder window.
-
On the main application "Tools" menu, click "Plugins" to open the Plugins Window. Click the button to open the panel on the right-hand side, and click to create a new plugin. Click in the body of the window, and press Ctrl-V to paste in the plugin script that you just copied. Then, on the File menu for this window, click "Save" to save your new plugin. You will be prompted to give it a name. Call this plugin "Smart folder plugin - Occupations" (say) and press .
Execution Sequence of Smart Folder Plugins
Ordinarily to run a plugin from the Plugin Window, you select it and
click . To run it under a
debugger, you open it in the debugger and press F5 (or
click the 'Go' button on the toolbar). With smart folder plugins,
once the code has been copied into the smart folder, no action is
required by the user to run the plugin. Family Historian will
execute it automatically whenever the relevant smart folder is displayed
in the smart folder pane. So the manner of execution is different,
but there is also another important difference. When a plugin is
run in the ordinary way, Family Historian will load the plugin into
memory and execute all the instructions contained within it, in
order. When it gets to the end, the plugin stops running and is
deemed to have completed. With smart folder plugins, when Family
Historian runs it, it will also load the plugin into memory and execute
all the instructions contained within it; but when it gets to the
end of the instructions, that is not quite the end of it. Family
Historian will then call the entry-point function FH_GetSmartFolderData, once only,
to retrieve all of the data required to display the various display
folders. When this function returns, the plugin is deemed to have
completed. This is similar to other special plugin types, except
that other special plugin types usually have multiple entry-point
functions where smart folder plugins have only one; and with other
special plugin types, their entry-point functions may be called multiple
times, whereas FH_GetSmartFolderData
will be called only once (unless of course the user causes the plugin to
be re-executed by closing and re-opening the smart folder pane, or by
clicking the 'Refresh' button in the Smart Folder Pane toolbar).
Debugging Smart Folder Plugins
The only way to debug a plugin (any plugin) is to run it in the debugger. But as we have seen, the way that a plugin is executed in the debugger is a little different from the way it will be executed in a smart folder context. All the important work in a smart folder plugin is done in the FH_GetSmartFolderData entry-point function. So that is what we need to test. How can this be done, given that the debugger has no special mechanism for calling entry-point functions? The solution can be seen in the "Smart folder plugin - Occupations" example that we just created above. The structure of this plugin (and indeed most plugins) can be put roughly like this:
function fn1()
 -- ... does something ...
end
function fn2()
-- ... does something ...
end
function main()
-- ... does something ...
end

main()
The 'main' function in the "Smart folder plugin - Occupations" plugin looks like this:
function main()
	if DEBUG_MODE then
		local tblInput = {};
		pi = fhNewItemPtr();  -- declare pointer
		pi:MoveToFirstRecord("INDI"); -- and set to the first record.
		while pi:IsNotNull() do
   			table.insert(tblInput ,pi:Clone());
			pi:MoveNext();
		end
		local tblOutput = FH_GetSmartFolderData(tblInput);
		local stop = true;
	end
end
This function will be executed if you run the plugin in the Plugin
Window, or if you run it under a debugger, or if you copy the plugin
into a smart folder and it is run when the user displays a smart
folder. But notice that, thanks to the "if DEBUG_MODE then ...
end" clause, the function won't actually do anything unless run under a
debugger. This is because DEBUG_MODE is a global variable which is
only set to true when the plugin is run under a debugger. So in
that case only, the function will declare a table, tblInput, and add
item pointers for all the Individual records in the project to that
table. It will then call FH_GetSmartFolderData
passing in this table as a parameter. The function returns a table
which is assigned to a local variable called 'tblOutput'. Finally
there is the line "local stop = true". The point of this line is
simply to have a convenient place to put a break-point, so that when you
run the program under the debugger, you can inspect the tblOutput
variable before the program finishes. The fact that the plugin
does nothing at all when run from the Plugin Window, is not a
problem. Also, the fact that the 'main' function effectively
does nothing when the plugin is run in a smart folder context, is also
not a problem. In that context, as mentioned before, the FH_GetSmartFolderData
function will be called as an entry-point function, immediately after
the instructions in the plugin have been executed. So the way that
FH_GetSmartFolderData
is called will be a little different, but it will be called in both
contexts, and the output of the function (the table it returns) can be
examined in the debugger's variable window when the plugin breaks at the
"local stop = true" line. To inspect the tblOutput variable, at
this point, either double-click on that variable in the Variable pane
(bottom-right), or right-click on it and choose "Inspect Variable" from
the dropdown menu that appears.
The Input Table Parameter
The FH_GetSmartFolderData function takes a single parameter: a table. The contents of this table will depend on the folder set type that the smart folder belongs to. If the folder set is an Individual record, the table will contain item pointers that point to Individual records. If it is a Family record folder set, the table will contain item pointers that point to Family records. If it is 'Fact' folder set, the table will contain item points that point to fact (that is, event or attribute) data items. And so on.
You should not assume that the table contains all items of the relevant
kind in the current project. For example, if the folder set is an
'Individual' folder set, you should not assume that there is one item
pointer for every Individual record in the current project. Smart
folders can be nested within other smart folders - which in turn can be
nested within yet more smart folders, and so on indefinitely. Each
smart folder effectively acts as a filter, potentially reducing the
number of items from a given initial list - so the input list for one
smart folder might be a reduced set of items returned by another smart
folder. When implementing a smart folder plugin, there is
nothing to prevent you from outputting data items to the output table,
which are not also in the input table, but this is considered bad
practice as it is not the way that smart folder are expected to behave
and it might create confusion in the mind of the user. Each smart
folder is expected to return a subset of the input items (and that
includes either all or none, which are a limiting case of a subset).
All plugins should, of course, always be designed to cope with the
possibility that the input table may be empty.
The OUTPut Table Return Value
Whereas the input table parameter is a (potentially empty) simple list of data items, the output table return value is more complicated. This is because a single smart folder can produce output corresponding to an entire tree of display folders, of arbitrary complexity. Using the Family Historian Sample Project, open the "Smart folder plugin - Occupations" plugin in the debugger, and set a break-point on the "local stop = true;" line, by clicking on that line and pressing F9. Then run the plugin by pressing F5. When the plugin breaks at the break-point, double click on the tblOutput variable in the Variables Window. The "Inspect Variable" window should open, looking something like figure 4 below.
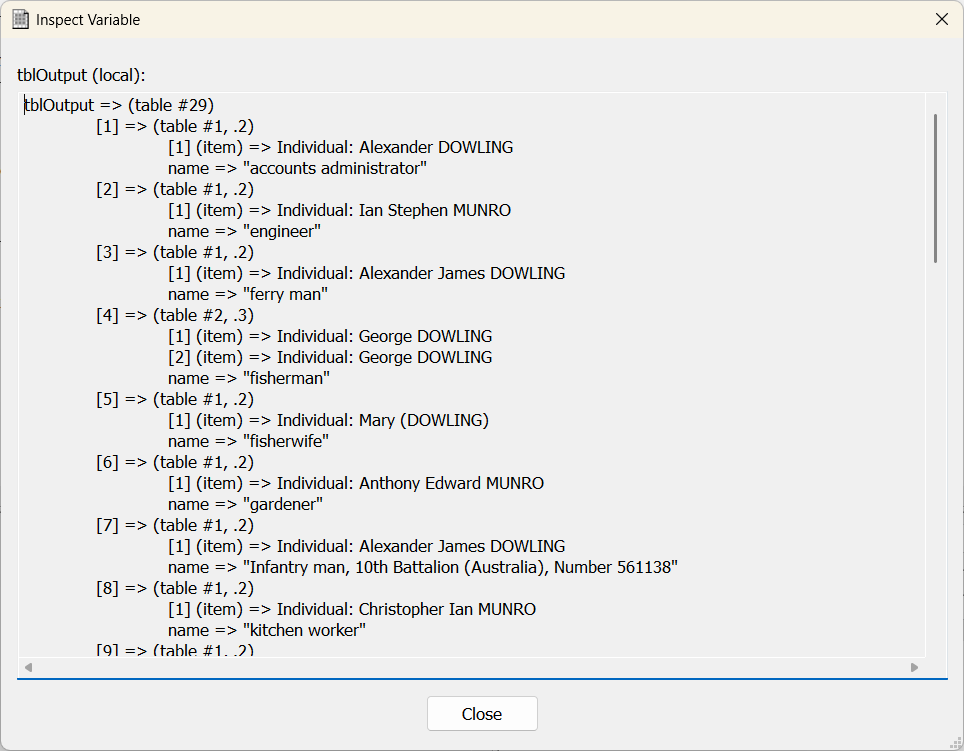
Figure 4. The Variables Window displaying part of the contents of the tblOutput
table.
Tables in Lua can have both array values (values that are identified by
a numeric index starting at 1), and "named" member values (that is,
member values that are identified by name). The image shows that
tblOutput has 29 array values. This is what "(table #29)" means.
The number after the hash is the number of array values (if a table has
non-array values, a second number following a dot is the total number of
values, including both array and non-array values). In figure 4
only the first nine array values are visible or partially visible.
But if you scroll down, you will be able to see that each of the 29
array values is itself another table. Call these tables "2nd-level
tables". In figure 4 we can see that as it happens, in this
example, of the first nine 2nd-level tables, all but one has exactly one
array value. The fourth 2nd-level table has two array
values. Whereas the array values of the top-level table are
tables, the array values of the 2nd-level tables (in this example) are
item pointers. Specifically, in this case, they are item pointers
to Individual records. Remember that the type of data item pointed
to by the item pointers will always correspond to the folder set type of
the smart folder.
As well as a number of array values, all of the 2nd-level tables also have a member value called "name". So, for example, the first 2nd-level table has one item pointer to an Individual record for Alexander Dowling, and its name is "accounts administrator". The second 2nd-level table has one item pointer to an Individual record for Ian Stephen Munro, and its name is "engineer". And so on.
When this table is returned, Family Historian will interpret this as an
instruction to display one folder for the returned table, and within
that, one subfolder for each 2nd-level table. The returned
(top-level) table has no "name" value. It doesn't need one because
the display folder corresponding to the returned table, will always have
the smart folder name ("Occupations" in this example). So, to
repeat, within that folder, the names of the 29 subfolders are given by
the "name" field within each 2nd-level table. The contents of the
subfolders are given by the array values.
However many levels of folder your plugin generates, at the last level, the tables must always contain an array of item pointers of the appropriate folder set type. At all levels above that, the tables will contain an array of tables. And all tables, except the topmost one, must have a "name" field, which gives the folder name.
We will call tables which contain an array of item pointers "tip" tables, and we will call higher-level tables (tables which contain an array of tables) "branch" tables. There will be one display folder for each such table (branch or tip). If the user selects a display folder corresponding to a tip table, in the smart folder pane on the left-hand side, the list pane (on the right-hand side) will display the items pointed to by the item pointers. Duplicate values in the tip table are allowed but will be removed prior to display. So the display folder corresponding to the "fisherman" table (the fourth 2nd-level table in the image above) will have only one row for George Dowling, and not two, even though the table has two.
If the user selects a display folder corresponding to a branch table, in the smart folder pane on the left-hand side, the list pane on the right-hand side will display all values for all tip tables nested within the branch table (at whatever level), with duplicates removed. For example, if the user selects the "Occupations" folder in the smart folder pane, Family Historian will display all Individual records for all tip tables nested within the main table - which in this case in practice means all Individual records that have one or more 'Occupation' attributes.
SORTING
In the first instance, Family Historian will display items in the list pane in the order that they are output by the plugin. However, this can be overridden. A smart folder of the plugin type can optionally have an associated query which specifies the display columns to use for that smart folder. To arrange this, tick the "Query specifies display columns" option in the Edit Smart Folder Window (see Figure 3 above). When that option is ticked, you will see details of a query on the right-hand side when you select the Occupations smart folder in Design Mode in the Query Window. There is no 'General' or 'Filters' tab in this case (no need for them). The only tabs are 'Columns' (to specify the display columns), and 'Results' (available so that you can run the query and see view how the columns will look). When you specify the display columns you can optionally also specify one or more sorts; and these will override whatever order the plugin may have output items in.Smart Folder Plugins Are "Read-Only"
Like report plugins and language plugins (and unlike source-driven data entry plugins and ordinary plugins) smart folder plugins are read-only. This does not mean that they cannot be used to update anything. Like any plugin, they could in principle update or delete files on your computer, for example. The label just means specifically that they cannot be used to update your project data (your project records and the fields contained within them). More specifically it means that you cannot call any of these functions:
- fhSetValue... functions (i.e. any functions with names beginning "fhSetValue..." - such as fhSetValueAsInteger)
- fhMoveItem... functions (there are only two: fhMoveItemAfter and fhMoveItemBefore)
- fhCreateItem
- fhDeleteItem
For the avoidance of doubt, a read-only plugin can call any method on any object. Some of these methods will update the state of objects, but they don't change project data, and hence are OK. You can also call fhCallBuiltInFunction. None of the built-in functions update program data. And you can call functions like fhSetIniFileValue. These change file values, but again, they do not change project data. To repeat, the only functions you cannot call in a read-only plugin are the functions listed above. If you call any of these functions from a read-only plugin, you will get an error.
The only other restriction on read-only plugins is that if you call fhInitialise in a read-only plugin (which you can do), the fourth parameter must be blank. That is to say, you cannot specify save requirements for read-only plugins.