This page gives a quick tour of Family Historian using pictures and text only. For a quick (6 minute) video tour of Family Historian, see A Quick Tour of Family Historian.
See What’s New in Version 6?for the latest new features and enhancements.
Click on any of the images shown below, to view it in close-up.
Getting Started with the Focus Window

The Focus Window is the main workspace?window. This image shows spouses and children for Ian Munro, with ?docked? property box on the right side.

The?Focus Window showing parents and siblings for Ian Munro (with no Property Box in this case).

The?Focus Window showing ancestors of Ian?Munro.

The?Focus Window showing descendants of Charles Munro.
Pictures and Multimedia

Pictures and other multimedia are shared resources in Family Historian. If a picture shows several people, for example, you will normally link it to all the people in the picture. The Media Window allows you to view all the media in the current project, or any subset, using whatever filter you want. In this example, the Media Window is showing thumbnails of all images in the current project. Double-click on any image to view the picture in close-up (see next).

The?Media Window showing one picture at a time. You can link each person to their face in each picture they’re in.
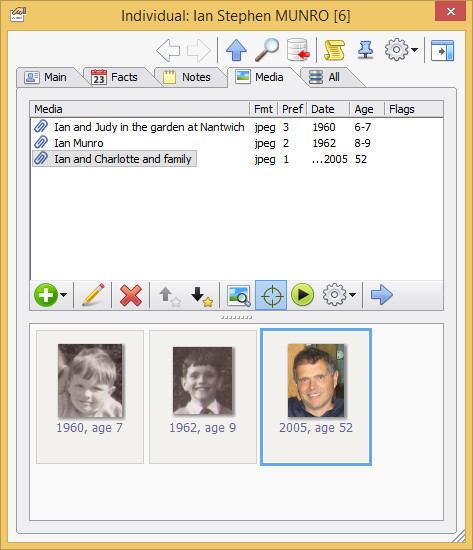
The Property Box showing thumbnails for Ian Munro (in close-up) in the Media tab. Uncheck the Close-up button on the toolbar, to view the whole picture. You can toggle between viewing thumbnails and full pictures here too. You can view the Property Box for any Individual (or other record type) at any time.
Interactive Diagrams and Smart Trees

Family Historian diagrams are interactive. They are used in numerous ways – for browsing and exploring, for data entry (by click-and-drag), for editing, and for creating charts to print out or send to others. Diagrams include Family Historian’s All Relatives diagram and the Everyone diagram.
Diagram branches have (optional) buttons which you can click on to expand or close the branch. When you do this, the diagram will automatically adjust to accommodate the change.

You can click-and-drag on boxes to add relatives. ?Again, diagrams automatically adjust to accommodate new records, and deleted or updated records. ?Enter details about the person in the Property Box. Using automatic source citations you can ensure that correct source citations are added, even when you add relatives in this way.

All trees in Family Historian diagrams are Smart Trees. You can move or resize boxes and branches and the trees adjust automatically. You have extensive control over the appearance, content and layout of all charts.
Data Entry with the Property Box

The Property Box (viewed briefly in previous sections) is the main data entry window. It is shown here with the Source Pane displayed (yellow panel on right).

This is another view of the Property Box, with the Source pane hidden.? It shows the Facts tab, where the events and attributes in the life of each person are recorded.? You can optionally display extended family timeline facts too, as shown here.? These are key events in the lives of close-relatives (with a light-grey background).

Entering accent characters is easy. If you press-and-hold any letter, when typing in any field in the Property Box or in the Automatic Source Citation pane, a popup window will appear just above the field, with a choice of accents for the letter in question. The choice of accent characters listed is configurable, and can include accent characters from any languages.

The Property Box is very configurable. You can adjust the text size, and resize or reposition the window. You can also adjust the relative size of panes within it. You can ‘dock’ it to the side of any workspace window or ‘float’ it in front. And you can customize which fields it shows and add new ones.

This window allows you to choose which data items appear on the Main tab of the Property Box. You can even add your own custom tabs if you wish.
Automatic Internet Data Matching

Make discoveries easily with Automatic Internet Data Matching to historical records and family tree profiles on Findmypast and MyHeritage databases. Hints display in the Focus Window when matches are found. These are little white and green circles showing the number of matches found. A popup window with more information appears when you hover the mouse over a hint (see right). Clicking on the hint shows the match in a web page (see next section). Some of the matches can be viewed and confirmed for free, while others require an appropriate subscription. Family Historian users receive an exclusive 25% discount on MyHeritage data subscriptions. Matches can be viewed in the new Web Search Window or an external browser. Note: Findmypast matching requires version 6.2 – a free upgrade for all version 6 users.
Web Clipping and the Web Search Window

Extracting data (text and pictures) from websites – sometimes called ‘web clipping’ – is easy using a combination of Family Historian tools and features. Typically you will use the Automatic Source Citation pane to create, or find, a Source record to represent the data you are clipping. Then you can simply drag-and-drop text or pictures from the web-page onto the Property Box. The new, or modified data, is given an appropriate source citation automatically. You don’t have to use Family Historian’s Web Search Window for web clipping (shown here). You can use an external browser if you prefer. Most browsers should allow you to click-and-drag text. Some browsers, and some websites, may not let you click-and-drag images. In that case, another option is to copy-and-paste (text and/or images) instead.
The Map Window

Use the Map Window to map the locations of all the places and events in your projects. View family movements over time, using the Time Slider. Choose any combination of people and events, and filter on event types, using the same or different markers. Click on a marker to view all events that occurred there in a popup window. For example, you can show all your ancestors? birth places marked in red, and all your spouse?s ancestors? birth places marked in green. Moving around the map, and zooming in or out to see more or less detail, is easy and fun. And you have a choice of two different map styles.
Reports
Family Historian comes with 32 standard reports, and you can create your own custom reports. All reports are highly configurable.Reports can be saved in PDF format, as word-processor documents (in Rich Text Format), as web pages (HTML format), or as text files.

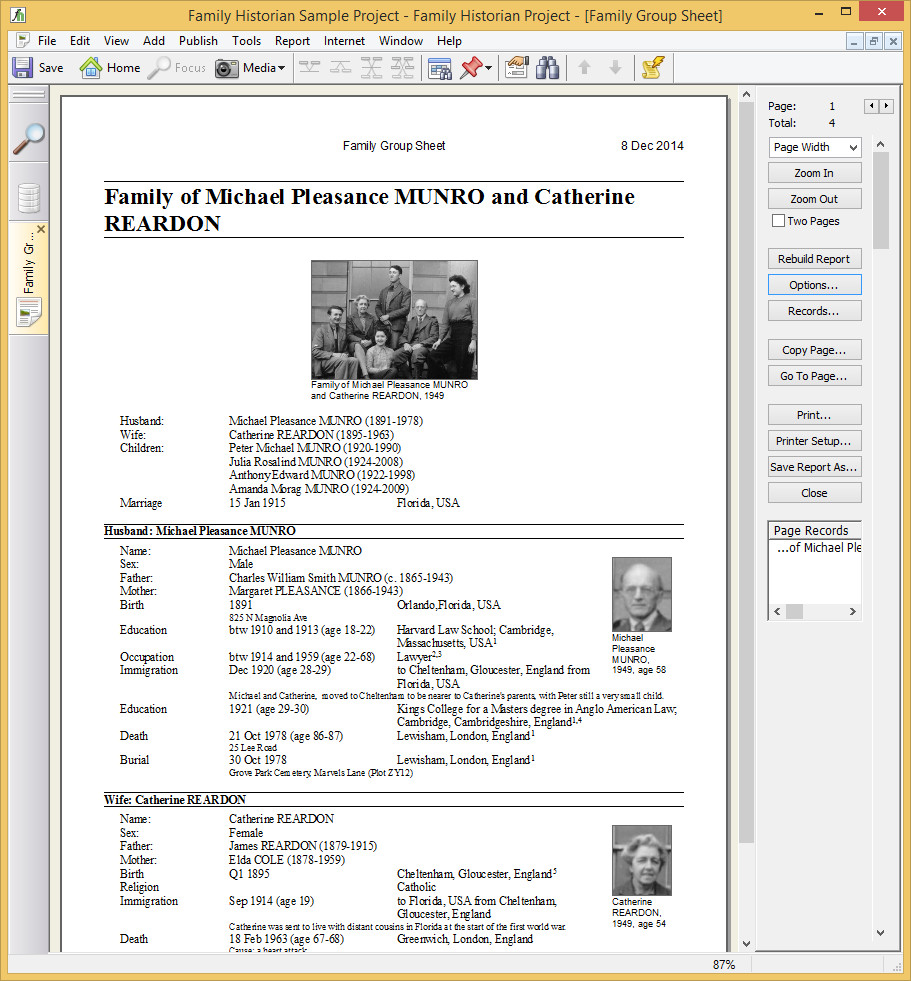
Reports include three different kinds of narrative reports, such as this Descendants by Generation report.
Create Books & Booklets

Create professional-looking family tree books and booklets, with a mix of auto-generated chapters and your own ‘free text’ pages and chapters. Add any reports, charts or diagrams to your books, as well as a title page, contents page, index page, and so on. Books can be saved in PDF format or in word-processor (Rich Text) format.
Create Websites & Family Tree CDs/DVDs
To create a website to display your Family tree, simply click on Create a Website on the Publish menu and a wizard will take you through a few simple steps, and then generate your website for you. Creating a great-looking family tree CD or DVD is just as easy.

An example website page. You can accept the default settings, or override them to configure the site as you wish.Visitors to your website can click on any picture or thumbnail image to see the full picture in a ‘popup’ window.

A picture displayed in a ‘popup’ window.
Explore Your Records

The Records Window allows you to search and explore your records. You can sort on any column, and configure columns to display whatever information you like. Use filters to quickly find the records you’re looking for.
Use Queries to Get the Most From Your Data

A query is a stored set of instructions for retrieving data, and for displaying it in a spreadsheet-like grid. For example, you might create a query to retrieve information about all the male ancestors of your spouse who died of a heart attack or whose cause of death is not known. Family Historian comes with 43 queries when installed, but you can easily create your own.
The Plugin Store

Download free plugins from the Family Historian Plugin Store to add yet more features and alternative tools for mapping, timelines, search/replace, and much more. Anyone can write plugins using the built-in scripting tools (see ‘Other Tools’ below) and submit them to the Plugin Store for all Family Historian users to share.To access the Plugin Store from within the program, click on Plugins on the Tools menu, and then click the Plugin Store button.
Other Tools

Family Historian includes a number of other powerful tools, such as…
- The Automatic Source Citation pane for automatically generating source citations for new and modified data.
- A powerful Find tool, and an equally powerful Find and Replace tool.
- An Internet Search tool
- A How Related tool to show how people are related, directly or indirectly (see image right). Click the ‘Display Graphically’ button to see exactly how the people are related on a diagram, or click ‘View Report’ to see the same information presented in a report.
- A Merge/ Compare tool to manage merging data files into your projects
- A tool to help you manage links to external files
- A tool to help you manage and work with record identifiers.
- A Backup-and-Restore facility
- Powerful built-in scripting tools can be used to automate repetitive tasks, make extensive one-off changes to your data, or even to create your own new tools or new kinds of output. If you want, you can even use them to create plugins for submission to the Family Historian Plugin Store (see above).
- A tool to help you split a family tree file into parts.
- A facility to help you create and work with Named Lists of records (named lists are used for research purposes as To Do lists, as bookmark lists, as lists of key people, and so on
- Powerful import/export functionality